Installing sACNView
To install sACNView on Windows, download and run the installer. Shortcuts will be created on the desktop and the start menu.
To install sACNView on Mac, download the .DMG file and open it. Drag the application into the Applications folder; it will now be available to run from finder.
If Windows alerts you that sACNView needs to make a network connection and that it is blocked by Windows Firewall, be sure to click ‘Allow’
Main Window
The main window contains multiple smaller windows for the different functions of the program.
Main Window Buttons
 The Scope view button opens an Oscilloscope View
 The View button opens a single universe view
![]() The Transmit button opens a transmitter for an sACN universe
The Transmit button opens a transmitter for an sACN universe
 The Snapshot button opens a window to snapshot and play back sACN universes
 The Multi-Universe Transmit button opens a transmitter for multiple sACN universes
 The PCap Playback tool allows you to playback streaming ACN data captured with a packet capture tool like Wireshark
 The Settings button opens the settings window
Universe List
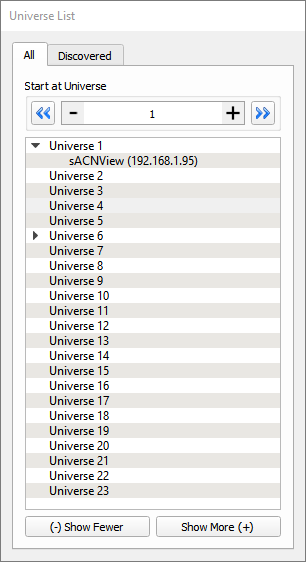
The Universe List is divided into two tabs, All and Discovered.
The All tab shows a tree view list of twenty sACN Universes (to which you can add more). Each universe can be expanded to show the names and IP addresses of active sources. You can select the universe at which the view starts using the arrow buttons at the top, or by entering a universe number.
The Discovered tab shows sources that have been discovered using the E1.17(2018) discovery method. Note that not all sources support this, so this may not show all sources in your network.
Double clicking on any universe will open up a universe view for that universe.
Universe View
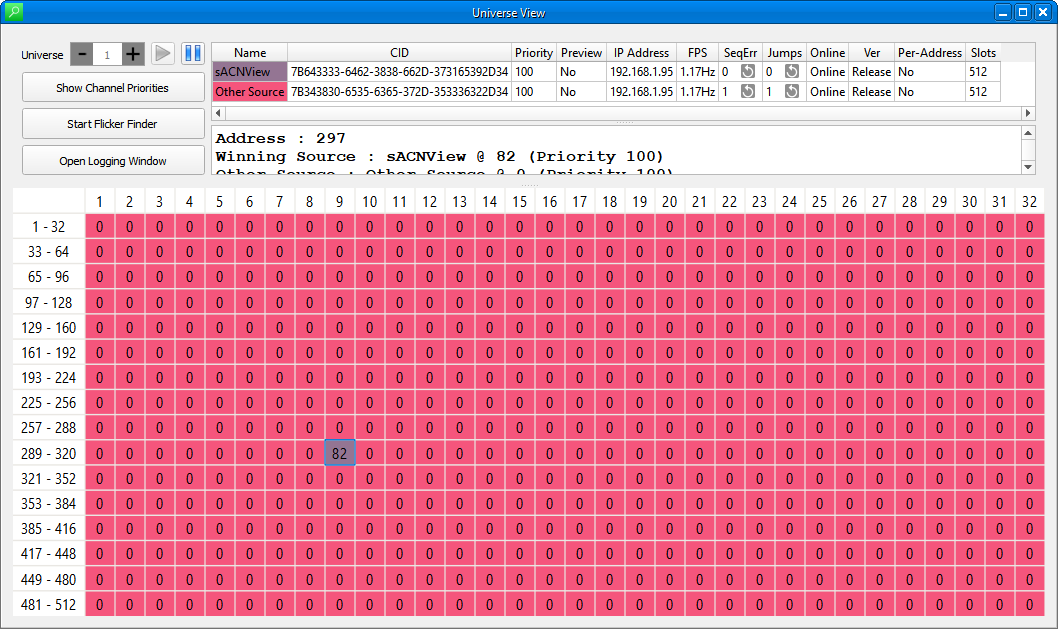
The Universe View shows a complete sACN universe, including all sources which are transmitting to that universe.
Sources are colour coded, and the colours correspond to the descriptions in the source table at the top.
For each source, the following properties are displayed in the top table:
- Name - the name the source advertises for itself
- CID - The “Component Identifier”, a unique identifier for the source
- Priority - The configurable priority of the source. This determines what happens when multiple sources are present at the same time
- Preview - This shows whether the source is sending preview data (for use by e.g a visualizer), or live control data
- IP - The internet protocol (IP) address of the source
- Rate (FPS) - The rate at which the source is sending data, in packets per second (Hz)
- Sequence Errors - A sequence error is specifically defined in the sACN Standard for packets which are missing or out of order. If you get frequent sequence errors, there may be a problem with your network.
- Jumps - A jump, unlike a sequence error, indicates any packets which are delivered out of order or dropped. One or two jumps are not unusual over time, but if you see many jumps you may have a network problem
- Note that both Jumps and Sequences Errors have a button to reset their respective counters
- Online - Shows whether the source is online or offline. When sources go offline they are preserved in the top table, although their levels no longer control anything in the grid view
- Ver - Shows the version of Streaming ACN the source is sending. sACNView supports both the ratified and draft versions of the standard
- Per-Address - Shows whether this source is sending per-address/0xDD packets
- Slots - Shows the number of slots that the source is including in its packets
In the main table section, the current levels of all channels in the universe are shown. Levels can be shown as absolute(0-255), percentage(0-100%) or hexadecimal (00-FF) as selected in the Settings dialog. The colour code allows you to identify which source has control of any given channel.
You can select a channel by clicking once on its level cell in the table. Once a channel is selected it will be shown in red, and you can see additional information on its level and the sources which control it. In the screenshot above, you can see that channel 7 is selected, and that there are two sources sending levels for it - the lighting console at level 123 and the Architectural System at level 226.
There are also tools to help troubleshoot intermittent problems. The flicker finder, when started, takes a ‘snapshot’ of the levels for the selected universe. All channels remain displayed in white until they change away from their snapshot value.
- Channels change to Green if their value has decreased from the snapshot value
- Channels change to Blue if their value has increased from the snapshot value
- Channels change to Red if their value has moved from the snapshot value and then returned to it
The pause button can be used at any time to temporarily halt the update of levels to allow inspection of data for individual channels
Sometimes it may be desirable to log every change of level, for example when troubleshooting an intermittent flicker. ‘Start Log to File’, and ‘Open Log Window’ allow you to do this by displaying every change of level on screen (log window) or saving every change of level to a file (log to file). Note that this can produce very large amounts of data if multiple channels are changing level at once).
You can switch the view to another universe by entering the universe number in the box at the top right and clicking ‘Go’
Scope View
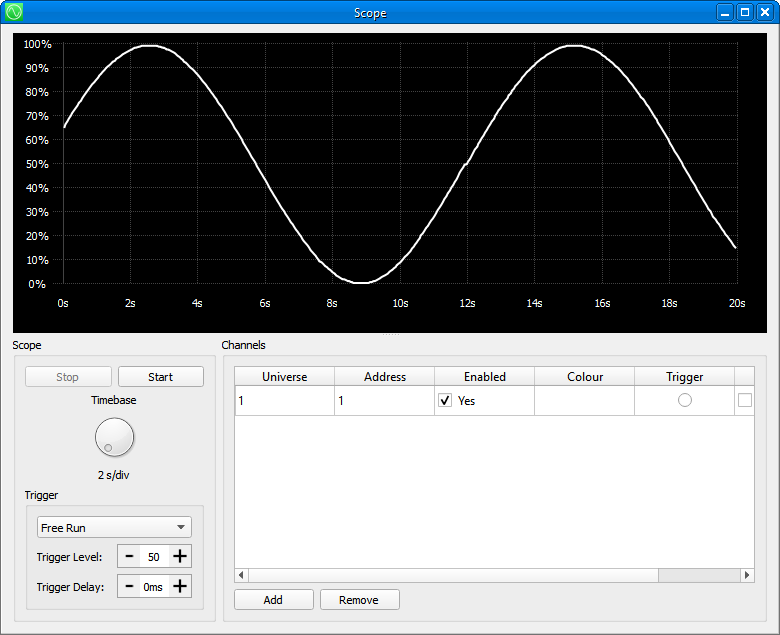
The Scope View presents an oscilloscope view of channel level data against time. It may prove useful in diagnosing things that are timing critical, such as macros on moving light fixtures.
You can add channels to be displayed simultaneously in the scope view, which may be in any universes. The ‘timebase’, or speed, of the scope is controlled by the rotary knob to the left.
You may pause the scope at any time using the ‘Stop’ button.
You can also set the scope to trigger on a threshold for diagnosing intermittent events.
Transmitting sACN
![]()
sACNView has the ability to transmit sACN levels in a variety of ways and patterns.
When you bring up the transmit window, the source will not begin transmitting until you click the ‘Start’ button. First, select a name for your source, a universe number, a priority, and whether you want to transmit live control levels or send blind/visualizer data. For more information about priority, refer to the Streaming ACN standard.
Once you have started your source, you have several options to control the levels sent. The default is to use the faders and keypad.
The faders can be slid up and down to set levels, and can be assigned to start at any address within the universe. Use the ‘Fader Start Address’ box to select which channel the faders start at.
A total of 8 presets can be recorded. The presets store all levels for the complete universe.
You can also set levels using the keypad; You can enter ranges (1 THRU 3), you can add addresses to a range (1 THRU 3 + 12), and you can remove addresses from a range (1 THRU 13 - 10).
To record a preset, set the desired look, then press the record button, then the button for the preset you wish to record.
In addition to using the faders, you can use the other tabs at the top to perform other level set functions:
-
Channel Check allows quick movement through channels in a universe, one at a time. You can type a number to jump directly to a channel; the blink button blinks the channel on and off.
-
Fade Range provides a set of effects for working with channels or transmitting dynamic levels
-
Grid Control shows the controlled channels as a grid. You can click, Ctrl+Click or Shift+Click to select channels or ranges of channels, and use the mouse wheel to increment or decrement levels.
Transmitting Multiple Universes
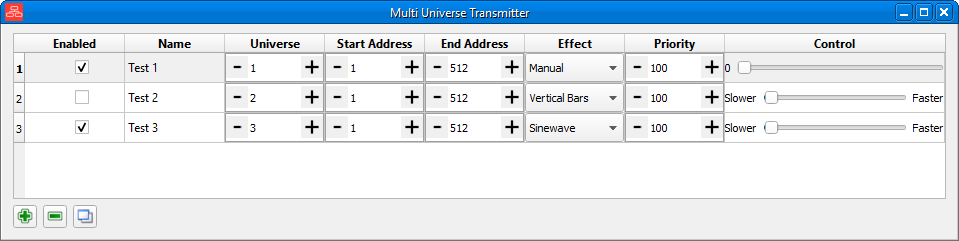 You can transmit multiple universes at once using the multi-universe transmit window. Add sources to the table and select the effect or control you want. The same effects are available as in the standard transmit window.
Snapshot
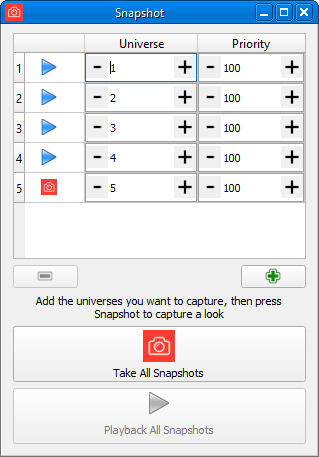
Snapshot allows you to capture and playback the current levels in a range of universes. This can be useful when you are maintaining a system and you need to take a piece of control gear offline.
To send a snapshot, first add the universe(s) you want to transmit by clicking the green plus button. Then, either one by one using the controls on the left of the table, or by taking all using the button at the bottom, snapshot the data you want.
Then, when you are ready to transmit, press the Playback button (which again can be per-universe or overall).
Once playing, the snapshots show an indictor to tell you if the state matches what it was when the snapshots were set up, so you can be certain that when you release the snapshot the lighting levels will not change. If the indicator is red, the levels are different to what was being sent. If the indicator is green, the levels are the same as what was being sent when the snapshot was set up.
PCAP Playback
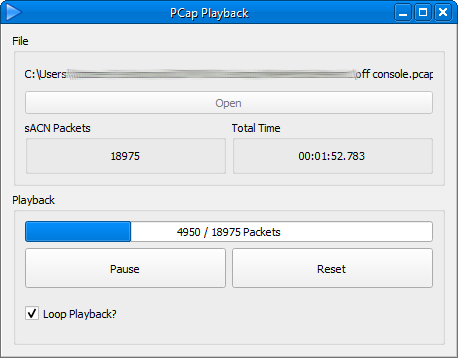
PCAP Playback allows you to replay the streaming ACN data from a packet capture (*.pcap) file. This can be useful when trying to recreate conditions from a site. You can use any packet capture tool like wireshark to capture this data.
To use, select the PCAP file and select whether you want to loop the playback at the end. The playback will begin, and show the position in the file below.
Program Settings
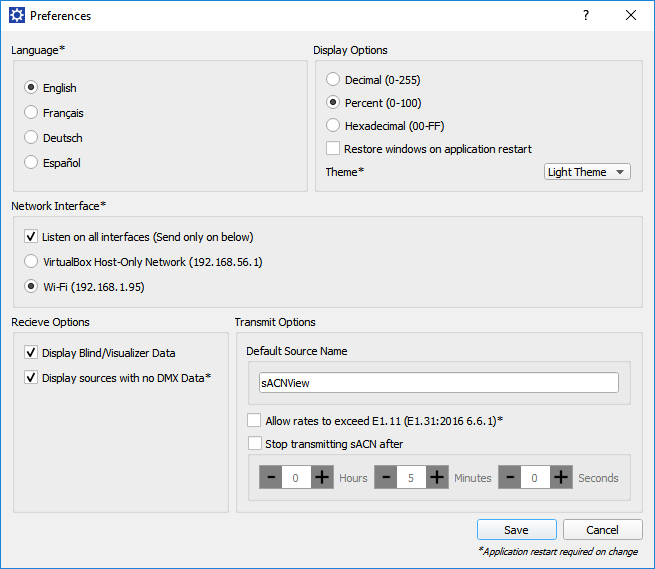
The preferences dialog allows you to set up options for sACNView. These are permanently stored on your computer.
The language selection sets which language the UI is presented in.
If you have multiple network cards, you can select the card to be used in the ‘Network Interface’ selection. This network card will be used to send and recieve sACN data. If you change the network card, the application will restart.
You can also select whether to listen on all network interfaces for sACN. If this is enabled then any sACN on any interface will be displayed. Note that this option is not available on Windows XP.
You can choose how you prefer to have levels displayed. Choose either decimal (0-255), percentage(0-100%) or hexadecimal (00-FF)
You can select whether or not to display blind or visualiser data. Blind data is data output by a console intended for display on a simulation program but not for live use
You can specify a timeout after which sACN will not be transmitted - i.e. once you start a source it will transmit for this amount of time and then stop.
You can specify a default source name. This is the name that will be used by default when you start transmitting sACN from the application.
Other Features
The application also features an interprocess communication API that allows you to use external systems to send or receive sACN. See the directory ipc example in the source code for an example of how to use it.